Tips for Passing Your Driving Test
Getting your driver license is exciting. Sitting in a car with a clipboard-holding stranger who is evaluating your every move? Not so much.
We know that the driving skills test can seem daunting at first, but it doesn’t have to be. In this post, we’ll show you how to prepare for
your drive test and what to do during your test so that passing it is a breeze!
What To Do Before Your Drive Test
Get Comfortable with the Maneuvers You’ll Be Tested On
While you won’t know ahead of time the exact route you’ll drive during your test or every instruction you’ll be given, the good news is that in
general, you’ll know what you’ll be asked to do, so it should be easy to prepare. The drive test will evaluate your ability to perform several
basic maneuvers. Below, we’ll walk you through each skillset to practice in detail.
Backing Up
Backing your vehicle is one of the first things you’ll probably have to do during your test, as you will need to back out of your parking space to
leave the DMV parking lot. To do this, put your foot on the brake and then put the car in reverse. Turn to your right and look over your shoulder
so you have a clear view through your back windshield. You may place your right hand on the back of the front passenger seat if this is more
comfortable to you. Keep your left hand on the wheel. Keep in mind that you should never just depend on your rearview mirror when backing.
Make sure you have a clear sightline by turning to look behind you while you back your vehicle. Then, gently lift your foot off the brake so
that you slowly move backwards. Only use the accelerator if you absolutely need to, and if you do, use it gently.
To steer the car in reverse, turn the wheel in the direction you want the rear of the car to go. Turning the wheel to the right will move you right,
and turning the wheel to the left will move you left.
When you’re finished backing, press down on the brake and put the car in drive.
Changing Lanes
During your drive test, the drive examiner will ask you to change lanes. When you change lanes, remember to S.M.O.G.:
- Signal. The first step in changing lanes is communicating with other roadway users around you. Activate your left or right turn
signal to let drivers around you know that you intend to change lanes and which direction you intend to go.
- Mirror. Next, check that the way is clear. You should use your rearview and side mirrors to survey the area around your vehicle.
Who is behind you? How far back are they? Is there room in the lane you intend to merge into?
- Over-the-shoulder. Never rely only on your mirrors to get a full picture of what’s going on around your vehicle. A car, bicycle,
or motorcycle may be hiding in your blind spot. Before you change lanes, always turn and look over your shoulder to be sure the path is clear.
- Go. When the way is clear, merge smoothly into the other lane and turn off your turn signal.
Turning at Intersections
During your drive test, the drive examiner will ask you to make left or right turns at intersections. When this happens, the first thing
you should do is make sure you’re in the proper lane. If you’re asked to make a left turn, you should get in the left turn lane if there
is one. If there isn’t a designated left-turn lane, get in the left-most lane. If you’re asked to make a right turn, get in the right lane.
Be sure to SMOG as you change lanes.
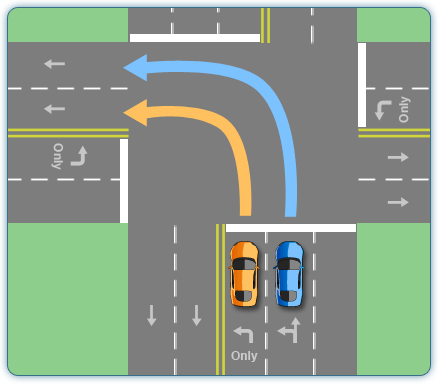 Left Turn
Be sure to activate your turn signal about 100 feet before reaching the intersection.
Once you reach the intersection, the drive examiner will be watching to make sure you follow proper right-of-way procedures. If you’re turning
left and have a green arrow, then you have the right-of-way. If you’re turning left and have the green light, remember that you must yield to
oncoming traffic. Also keep an eye out for pedestrians, as they may have the WALK signal.
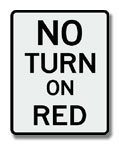
If you’re turning right and the light is green, you have the right-of-way. If the light is red, look for a “No Turn on Red” sign. If none are
present, you may make a right turn on red as long as the way is clear. Remember that if you have the red light, you must yield the right-of-way
to others.
 No Turn on Red Sign
If the intersection is controlled by a stop sign rather than a traffic light, make sure you come to a complete stop behind the white limit line.
If it’s a four-way stop, pay attention to who arrives first. If two vehicles arrive at the stop sign at the same time, the driver on the left
should yield to the driver on the right.
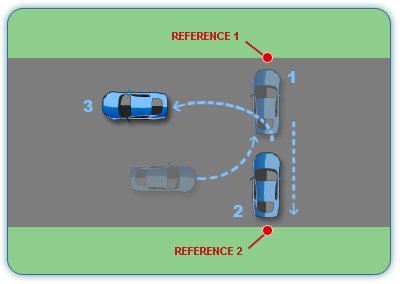
3-Point Turns
You may be asked to do a 3-point turn during your drive test. A 3-point turn is a done when there are no side roads or driveways to turn into.
You must do the 3-point turn completely in the road. To conduct a 3-point turn, do the following:
- First, check for traffic and pedestrians. This maneuver should not be conducted when there is other traffic driving on the road with you. If the road is clear, turn your car so that it is facing the left curb. This is point one.
- Second, check your rearview and side view mirrors for vehicles and pedestrians and look over your shoulder to check your blind spot. Reverse, giving yourself enough room to turn your car left. Don’t hit the curb behind you. This is point two.
- Lastly, signal left and steer your car to the left until it is facing the opposite of the direction you were originally driving. This is point three.
 3-Point Turn
Parallel Parking
Perhaps the most dreaded of all driving maneuvers is parallel parking. Note that not everyone is asked to parallel park during their drive test,
so you could luck out. But just in case Lady Luck doesn’t shine on you on your big day, it’s a good idea to master this skill so you have it
if you need it.
It’s best to begin practicing parallel parking on a quiet residential street. Then, when you get the hang of it, move to an urban environment.
Here’s a step-by-step breakdown of the process:
- To start, look for a spot between two cars that is about one and half times the size of your vehicle. When you identify your spot, use your
turn signal to show the drivers behind you your intention to park.
- Pull even with the car in front of the space where you want to park. You should be about 2 feet from their vehicle. If your vehicles are different
lengths, line up your back bumpers.
- Stop and turn your front wheel all the way to the right. Back up slowly toward the curb.
- When your front seat is opposite the rear bumper of the front vehicle, quickly turn your steering wheel all the way to the left. Back up slowly toward
the vehicle behind you without touching it.
- Center yourself in the space.
Watch this video, which breaks down parallel parking step-by-step.
Practice in the Vehicle That You’ll Use for the Test
Once you’re comfortable with the basic maneuvers you’ll be tested on, try to simulate your drive test the best you can while practicing.
This means you should practice in the vehicle that you’re going to take the test in. Every vehicle has a different feel to it.
SUVs sit much higher off the ground then sedans, for instance. This means your field of vision may be different in each vehicle.
Vehicles have different turn radiuses depending on their size and different stopping distances depending on their weight and the quality
of their brakes. Lights and gears may be in different places on the dashboard or the steering wheel. The list goes on and on.
The point is, every vehicle is different and will feel different when you’re operating it, so really get to know the vehicle that you’ll
be using for your test.
Familiarize Yourself with Your Test Environment
In addition, be sure to familiarize yourself with the environment around the DMV where you’ll be taking your test. Is it rural or urban?
Are there are a lot of one-way roads? Hills? Busy intersections? Where might you be asked to parallel park? It’s a good idea to spend
some time driving around this area, as these are the roads you’ll be driving during your actual test. What intersections are nearby?
What traffic signs and signals do you notice? You might even have a parent or guardian pretend to be the drive examiner. Start at or
near the DMV and have them give you instructions as you drive. Afterwards, listen to their feedback on what you did well and where you can improve.
What To Do the Day of Your Drive Test
Before you head to your drive test, pre-inspect your vehicle. Make sure your tires are in good condition, you have plenty of wiper fluid,
and your windshield is clean. Set your mirrors properly.
Make sure you have everything you need before you head to the DMV. You will need your permit and proof of insurance handy.
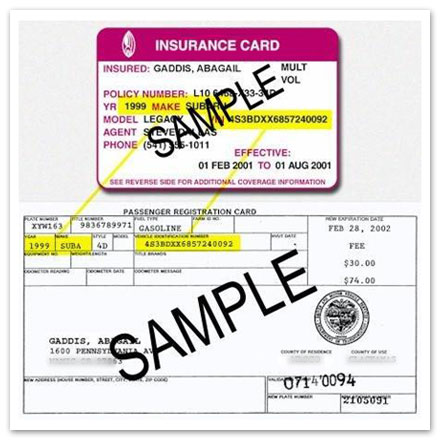 Proof of Insurance
It’s a good idea to get to the test center early so you give yourself plenty of time to get acclimated and relax. Bring a book to read while you
wait or a favorite podcast to help calm your nerves.
What To Do During the Drive Test
During the drive test, take a deep breath. You’ve got this. All of your practice and hard work is about to pay off.
Remember that the drive examiner is there to help you. Feel free to ask questions if you need further clarification on what they’re asking you to do.
Focus on your drive test—don’t worry about trying to make conversation with the examiner.
During the test, be sure to do the following:
- Keep the proper hand positioning on the steering wheel. You want to be at 9 and 3.
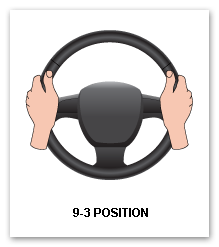 9-3 Position
- Adjust your mirrors when you get into the vehicle and visibly check your mirrors and turn your head to check your blind spots during the test when
changing lanes.
- Leave plenty of room between you and the car in front of you. Use the three-second rule.
- Pay attention to road signs and signals while you’re driving and follow them closely. Look for “No Turn on Red” signs when making a right turn.
- Stop behind the white limit line at stop signs and stop for 2-3 seconds before proceeding.
- Pay attention to the speed limit. Check your speedometer periodically to make sure you’re not going over.
When the test is over, the drive examiner will give you your score and go over any mistakes you made. If you passed (congrats!), you’ll have your picture
taken for your driver license and be given a temporary paper permit until your real driver license arrives in the mail. Always carry this with you
when you drive.
If you don’t pass, don’t worry. The drive examiner will tell you when you can take the test again. In the mean time, keep practicing.
Don’t worry, you’ll get it!